
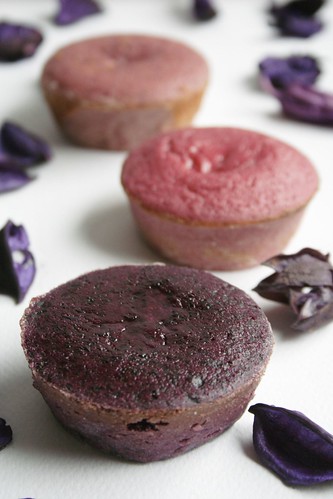
I wanted blueberry cupcakes like you've never seen them before. None of this blueberry muffin disguised as cupcake with a bit of tinted frosting. I wanted blue through and through, people. There's just one teeny tiny problem. Blueberries don't pack the same flavour punch as their brash raspberry and blackberry contemporaries. So although my cupcakes look berry blue, their taste is berry subtle.
On to the photos.
Cupcakes, pre-frosting. Someone couldn't help herself, apparently.
A berry blue sumo wrestler preparing to duel.
Alternatively, Mount Berry Blue.
A berry blue bouquet.
Cupcake prison.
Berry Blue Cupcakes
Blueberry Puree:
Bring 1 pound of blueberries (fresh or frozen) to a boil over low-medium heat. Reduce heat and simmer, stirring occasionally, until most of the liquid has evaporated and the mixture is thick (about 1/2 hour). Cool the mixture slightly before blending in a food processor until smooth. For an extra smooth puree, pass the mixture through a fine sieve before using.
Yields about 1 1/4 cups.
Blueberry Cupcakes:
2 cups + 2 tablespoons flour
1 teaspoon baking powder
1/4 teaspoon salt
1 cup of butter
1 1/2 cups sugar
2 large eggs
1/4 cup whole milk
1/2 cup blueberry puree
1/2 teaspoon vanilla
Preheat oven to 350 degrees Fahrenheit and line muffin tin with paper cups.
In a large bowl, cream together the butter and sugar until pale and fluffy. Add one egg at a time, beating just until incorporated.
In a medium bowl, sift together the flour, baking powder and salt. In a small bowl, mix the milk, blueberry puree and vanilla.
Add wet and dry ingredients alternately to the butter mixture, beginning and ending with the dry ingredients. Mix just until incorporated after each addition. Do not overbeat!
Divide the batter evenly among the 12 paper cups. Spoon 1 teaspoon of blueberry puree into the center and mix in slightly with a wooden skewer or small spoon.
Bake for 18-22 minutes or until cake springs back to the touch. Cool for 10-15 minutes in the pan, then turn out onto a wire
rack and cool completely before frosting.
Blueberry Cream Cheese Frosting:
8 ounces cream cheese, room temperature
6 tablespoons butter, room temperature
1/2 cup blueberry puree
2 1/4 cups icing sugar
drop or two of almond extract
In a medium bowl, beat the cream cheese and butter until light and fluffy. Mix in the blueberry puree and almond extract just until combined. Add the icing sugar gradually and beat until smooth and spreadable.
Frost the cooled cupcakes as you wish. Store in the fridge, but bring to room temperature before serving.
Yields 12 cupcakes.
Notes: I didn't bother straining my blueberry puree because I quite enjoy the little purple flecks. As the recipe suggested, I added a blueberry puree swirl on top of the cupcakes before baking. Next time, I'd fill the paper liners partway, add the puree, then top them with the rest of the batter for a hidden surprise! Finally, for reasons unknown, my cupcakes took about 25-28 minutes to bake all the way through.
Source: The cupcake recipe is one used by Trophy Cupcakes, which I found on Cakespy Seattle. I wasn't feeling the swiss meringue buttercream they suggest, so I whipped up a simple blueberry cream cheese frosting instead.
Sunday 22 February 2009
Blueberry Cupcakes
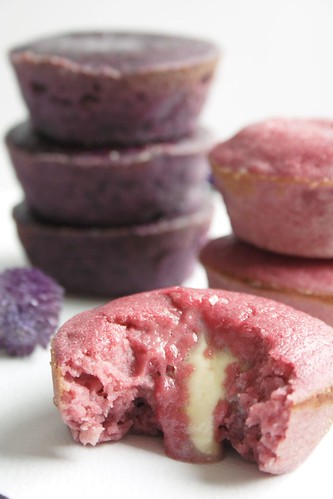
Blueberry, Raspberry & Blackberry Cupcakes
The recipe makes only 3 cupcakes, so I made two more batches, one with blueberries, and the other one with blackberries.
Recipe:
100 g frozen raspberries
1 egg
30 g flour
25 g sugar
3 squares white chocolate
Puree raspberries in a blender and press through the sieve to remove the tiny seeds. Beat egg and sugar until white and foamy. Add raspberry puree and flour and mix on lowest speed for a few seconds to incorporate.
Grease and flour cupcake pan and pour batter in. Place one square chocolate on top of each cupcake and press it inside with a toothpick.
Bake in a preheated oven on 200°C for about 7-8 minutes.
Chocolate Loaf Cake
The last loaf you'll ever need ;)


Cake fondant ultra-chocolaté
Adapted from Nigella Lawson’s Feast.
As you’ll make the batter, you’ll definitely measure how good the cake is. Deeply fragrant, with a melt-in-your mouth texture.
Shall we all thank the cocoa powder. And melted chocolate. And cocoa syrup. And fine chocolate slivers.
However - and trust me, this is a not a problem - the recipe yields to two loafs. But they freeze beautifully, and they texture even benefits from they’re little Aspen-like vacations.
Cake fondant ultra-chocolaté
makes two loafs
for the cake
200g plain flour
1/2 tsp baking soda
50g cocoa powder
275g caster sugar
175g butter
2 eggs
1 tblsp natural vanilla extract
175g chocolate, melted
80g double cream
125g boiling water
for the syrup
1 tsp cocoa powder
125g water
100g caster sugar
for the topping
25g milk chocolate
Preheat the oven to 170°C. Grease and line two loaf tins (21 x 11cm and 7.5cm deep) with baking paper, making sure you cut it well above the rim so you’ll have handles to later get the cake out from its tin.
Put the flour, baking soda, cocoa, sugar, butter, eggs, vanilla extract, melted chocolate and double cream into a bowl, and mix with a wooden spoon until smooth. Slowly incoporate the boiling water and divide the batter between the twi loaf tins.
Bake for an hour, or until firm to the touch.
As soon as the cake is baked, remove from its tin using the baking paper, and place on a cooling rack, leaving the baking paper in place.
Put the syrup ingredients of cocoa, water and sugar into a small saucepan, and boil for approximately five minutes, until thickened.
When the syrup is ready, pierce the cake a few times using a skewer or a long match, and pour the syrup as evenly as possible over the cake. Let the cake become completely cold, remove the paper, and place it on your serving plate.
Get your chocolate, and slice thin slivers off the block with a heavy knife, until you’ve got enough to cover the top of the cake.
Secret, Gooey, Good Brownies
Luxury Brownies (with secret recipe)
 .
.
LUXURY BROWNIES RECIPE
.
These brownies are ’seriously’ the BEST. I can assure you. Wanna know why? Because it’s got plenty of delicious nuts (pistachio, walnuts, hazelnuts, pecans) in them, & it is double chocolatey, as it uses both cocoa & solid chocolates in the recipe - which is unusual, when most recipes call for just ‘either or’.
.
Texture: moist, dense & fudgy.
Difficulty: easy as pie.
.
Ingredients:
230g Butter, roughly cubed
300g Sugar (Granulated or Castor)
200g Whole eggs (approximately four) whisked up
230g Dark Chocolate - in small pellet form or chopped finely so it melts quickly
140g Flour
40g Cocoa Powder
200g of nuts of your choice (pistachio, walnuts, hazelnuts, pecans - You can use just one type or use all four types like I do. They add different crunchy textures to every fudgy bite, which makes the brownie interesting til the last bite)
20cm square baking tin
.
Prepare:
a. Butter the baking tin. Then line the bottom & the sides with baking paper.
b. Sift together the flour & the cocoa powder.
c. Have the chocolates ready in a large mixing bowl.
d. Leave aside some nuts to decorate the surface of the brownies with (in my opinion, walnuts look best).
e. Preheat oven to 180 degrees.
.
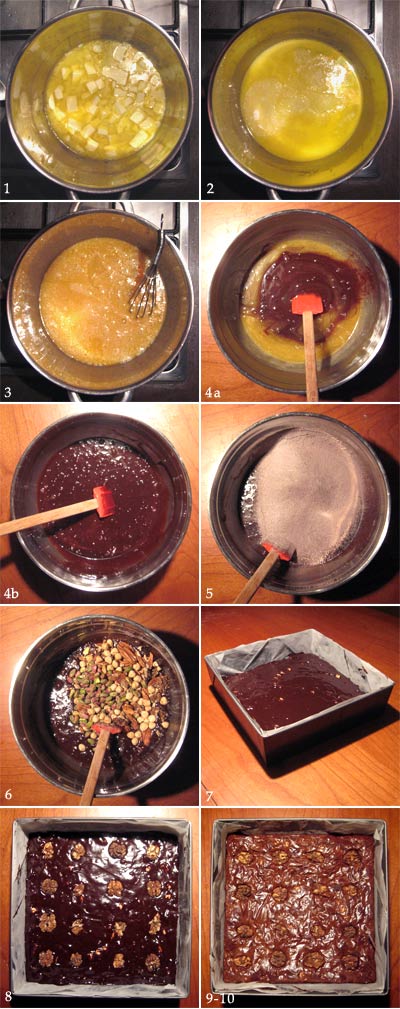
Method:
1. Melt the butter completely in a large pot.
2. Add the sugar. Dissolve.
3. Pour the egg mixture & mix well with a whisk (make sure the hot butter doesn’t cook the egg in to an omlette).
4. Pour the hot mixture over the chocolates in a bowl. Mix thoroughly & make sure all the chocolates have dissolved (if you still have lumps of chocolates left, zap it at 10 second intervals in the microwave until it melts).
5. Spatula in the flour & the cocoa powder. Mix until no traces of flour can be seen.
6. Mix in the nuts. (Make sure you leave some aside for decorating the top with).
7. Pour the mixture in to the prepared tin.
8. Evenly decorate some more nuts on the top surface. (Make sure each slice would have a decorative nut)
9. Bake in the oven (that has been pre-heated at 180 degrees) for 25 - 30 minutes. It’s cooked when the edges have gone slightly dry, the top is shiny & has cracked. The centre of the brownie shoudn’t be wobbly when shook. Remember: the toothpick method won’t work on this fudgy brownie!
10. Leave aside to cool. Don’t cut until they’ve reached room temperature, or even better leave it untouched for a WHOLE DAY to rest - I can promise you, it’ll taste better tenfold.
.
 .
.
Note:
This recipe is versatile - instead of nuts, you can put pretty much anything in there - like dried fruit such as dried cherries, or fresh fruits like raspberry. Baking is meant to be fun & so don’t go out-of-your-way to buy the nuts if you haven’t got it (as nuts can be expensive). Use whatever that is in your store cupboard & experiment! like, be creative with sliced almonds & spell a letter on the surface!
Unnecessary Brownies
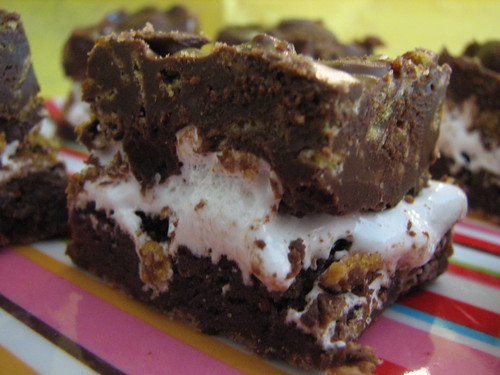
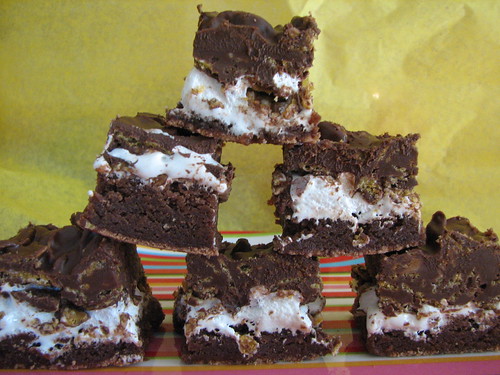
When I say, cut the brownies into 1" by 1" squares, I'm not kidding. These babies will guarantee a 2 pound weight gain and your teeth will beg mercy from the sweetness if you go much bigger.
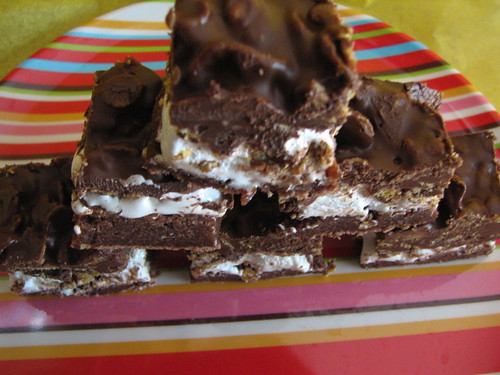
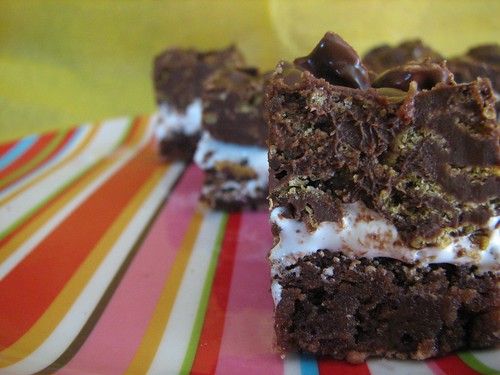
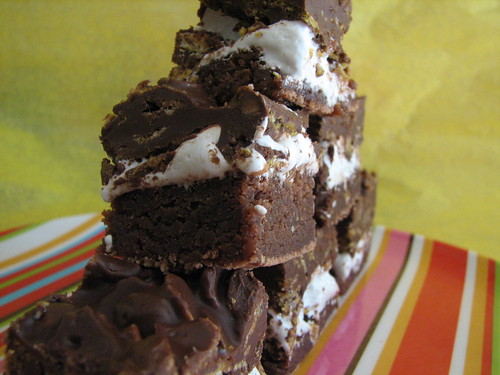
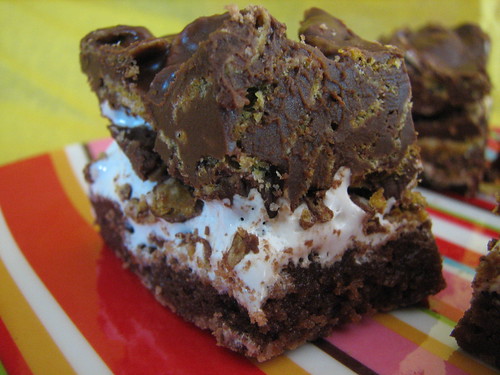
Chocolate Crunch Brownies
Serves 36
1 c. butter, softened
2 c. sugar
4 eggs
1/3 c. baking cocoa
1 c. all-purpose flour
2 tsp. vanilla extract (I used vanilla paste)
1/2 tsp. salt (I used 3/4 tsp. to give it a lil more saltiness with all that chocolate)
1 (7 oz.) jar marshmallow creme
1 c. creamy peanut butter
2 c. semi-sweet chocolate chips (12 ounces)
3 c. corn flake cereal
Preheat oven to 350º F. Grease (or spray with Pam w/flour baking non-stick spray) a 9" x 13" x 2" Pyrex baking dish, set aside.
In a mixing bowl, cream butter and sugar; add eggs. Stir in cocoa, flour, vanilla, and salt.
Spread into prepared baking pan.
Bake 25 minutes or until brownies test done.
Cool. Spread marshmallow creme over cooled brownies.
In a small saucepan, melt peanut butter and chocolate chips over low heat, stirring constantly. Remove from heat; stir in the cereal. Spread over marshmallow layer.
Chill before cutting.
My Notes: The brownies rose as if they were going to be cake-like in the oven. But once they started to cool, they flattened out and were of the chewy variety, as I was hoping for
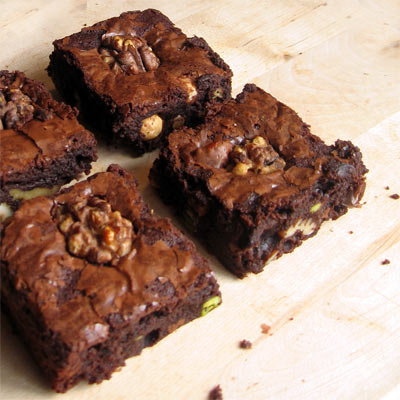
Pistachio Topped Brownies


I also like to add a generous amount of melted milk chocolate on top and sprinkle with pistachios.

So there you go, this is brownies my way. If you ever get bored of your classic brownie recipe, give this one a try and let me know how you like it.
Edit (April 2, 2008) - The recipe below and the photo of my brownies made it to Nick Malgieri’s article “On These Blogs, Bakers Can Find Their Fix” for The Washington Post! Read all about it here.
Brownies My Way
Ingredients
- 9 ounces bittersweet chocolate, chopped
- 1 stick butter
- 1 1/2 cups sugar
- 4 eggs
- 1 teaspoon vanilla extract
- 3/4 cup plus 2 tbsp all-purpose flour
- 1/2 tsp salt
- 6 ounces milk chocolate
- 1/4 cup pistachios, slivered
Method
- Center a rack in the oven and preheat your oven to 350F. Butter an 8 inch square pan, line bottom and sides with parchment paper and set aside.
- Melt butter and bittersweet chocolate in a bowl over simmering water and let cool to room temperature.
- Add sugar and whisk until combined.
- Add the eggs, one at a time, and whisk until combined. Add the vanilla extract. Fold in flour and salt.
- Pour the mixture into the baking pan, smooth the top with a spatula and bake for 35-40 minutes. Let cool to room temperature.
- Melt the milk chocolate in a bowl over simmering water. Let cool for 5 minutes and pour over cooled brownie.
- Smooth the top with a spatula and sprinkle with pistachios.
- Place in the refrigerator and let the milk chocolate set. Serve it cold.
Raspberry Pistachio Tart

My trials with Dorie Greenspan’s sweet tart dough recipe continues. The original recipe is located here.
This time, I added pistachios to the dough (1/4 cups) and it turned out amazing (even tough I overbaked it). It would have been better to use more as I hoped to see some flakes here and there in the dough.

.

Dorie Greenspan’s basic pastry cream recipe is a star, too. Adding the butter in bits at room temperature is what makes it so silky.

Pastry Cream
Recipe from Dorie Greenspan’s book “Baking: From My Home to Yours”
Ingredients
- 2 cups whole milk
- 6 large egg yolks
- 1/2 cup sugar
- 1/3 cup cornstarch, sifted
- 1 1/2 tsp pure vanilla extract
- 3 1/2 tbsp unsalted butter, cut into bits at room temperature
Method
- Bring the milk to a boil in a small saucepan.
- In a heavy-bottomed saucepan, whisk the yolks together with the sugar and cornstarch until thick and well blended. Still whisking, drizzle in about 1/4 cup of the hot milk. Whisking all the while, slowly pour in the remainder of the milk.
- Put the pan over medium heat and, whisking vigorously, contstantly and thoroughly bring the mixture to a boil. Keep at a boil, still whisking, for 1 to 2 minutes, then remove the pan from the heat.
- Whisk in the vanilla extract. Let sit for 5 minutes, then whisk in the bits of butter, stirring until they are fully incorporated and the pastry cream is smooth and silky. Scrape the cream into a bowl. Press a piece of plastic wrap against the surface of the cream to create an airtight seal and refrigerate until cold or, if you want to cool it quickly put the bowl into a larger bowl filled with ice cubes and cold water and stir the pastry cream occasionally until it is thoroughly chilled, about 20 minutes.
- The pastry cream can be kept, tightly covered, in the refrigerator for up to 3 days.